Custom vulnerable Active Directory
Vulnerable Active Directory Lab OSCP Style
Automated custom-built vulnerable Active Directory environment designed to simulate a full attack chain OSCP Style. This lab automates the vulnerabilities in CLIENTS machines and DC, in order for the scripts to work, the Domain Controller has to be already created and the CLIENTS machines already joined to it. This lab assumes a breach scenario as is common in real-world penetration testings. It also includes intensional misconfigurations such as an exposed SMB share with users files, users accounts that are AS-REP roastable and Kerberoastable, and privilege escalation paths that allow password changes for a privilege user. Exploiting these weaknesses step-by-step leads to a successful DCSync attack and full domain compromise. SEE FULL PROJECT HERE
- CLIENT1 CREDENTIALS
Username: adrian
Password: Not4@ver3ge!
This lab automates the vulnerabilities in CLIENTS machines and DC, in order for the scripts to work, the Domain Controller has to be already created and the CLIENTS machines already joined to it
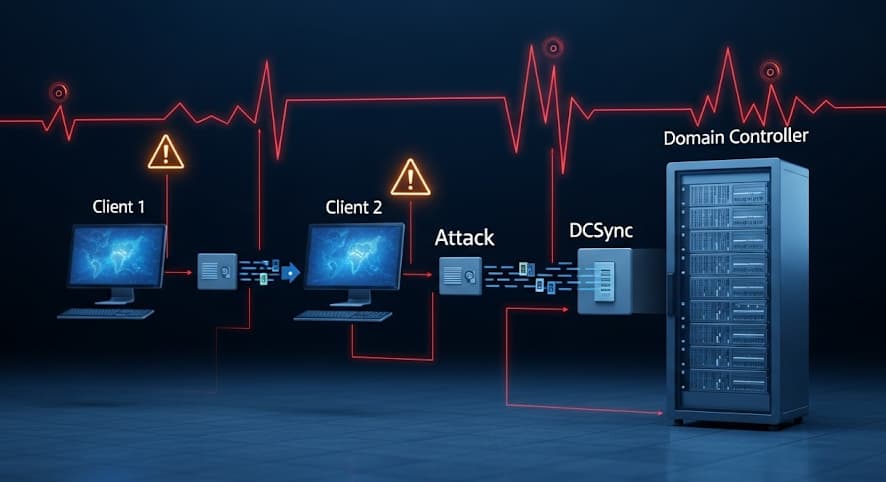
Diagram
Lab Key Features
- Active Directory Automated Domain setup: Weak passwords, delegated permissions, GPO disables Defender, Firewall, Updates
- Vulnerable User Accounts: Kerberoasting, AS-REProastable
- Privilege Escalation Paths: Reset Password, DCSync
- Hardening Bypass on CLIENT1: RDP Access, SeImpersonatePrivilege
- Exploitable SMB share on CLIENT2: SMB folder with zip file
- Walktrough OSCP Style + Template using Sysreptor
Lab Objective
The goal of this lab is to simulate a realistic attack chain in an Active Directory environment. It shows how common misconfigurations and overlooked settings can be combined to compromise an entire domain. It can be used as reference for pentesters portfolio.
To Download:
Environment Setup & Configuration
-
Import VMs in VirtualBox/VMware.
-
Assign Internal Network interfaces to VMs
-
Install Windows Server and Client ISO
-
Create a new Forest on Windows Server
-
Join CLIENTS to DC, all of them have to be in the same Internal network/share the same IP range
-
Add a second Internal Network adapter to kali and Client1 for communication from VM Manager
-
Set IP in CLIENT1 : 192.168.10.101
Network & Internet Settings > Ethernet > Properties > IPv4 IP: 192.168.10.101 Netmask: 255.255.255.0 -
Set IP in Kali : 192.168.10.100
sudo ip addr add 192.168.10.100/24 dev eth1
sudo ip link set eth1 up
Take a snapshot of all 3 machines before running the scripts in order to be able to reset the changes.
Sharing scripts to internal clients (CLIENT2 and DC)
- Download the scripts to your kali machine and share them with python to download them from CLIENT1
python3 -m http.server80- In CLIENT1 download the files and put them in a SMB Folder so they will be accessible from any machine
mkdir C:\FILES
iwr -uri http://<IP>/DC_script.ps1 -Outfile DC_script.ps1
iwr -uri http://<IP>/c1_script.ps1 -Outfile c1_script.ps1
iwr -uri http://<IP>/c2_script.ps1 -Outfile c2_script.ps1
iwr -uri http://<IP>/images.zip -Outfile images.zip
Share FILES directory
You have to loggin in all machines as Domain Admin and run the scripts in a Powershell console as Administrator.
Domain and Clients configuration
DC
- Access \\Client1\SHARE and download DC_script.ps1, open a Powershell console as Administrator and run the script. It will create domain users, AS-RERProastble and Kerberoastable users, create a GPO to disable windows updates, firewall and defender, assign Reset Password and DCSync permissions.
powershell -ep bypass
.\DC_SCRIPT.PS1- We restric LDAP queries for Nicol following the next steps. By restricting LDAP queries user Nicol won’t be able to gather Domain info using tools as rpcclient or ldapsearch.
Go to: Group Policy Management
	Group Policy Objects > Deny LDAP Access > Edit
		Computer Configuration > Policies > Windows Settings > Security Settings > Local Policies > User Rights Assignment
Deny Access to this computer from the network > Add User or Group > LDAP_Deny_Group- As the final step we link the GPO to the Domain Controllers ( The script already creates the Group and the GPO but manual step is necessary)
Go to : Group Policy Management
	Domain Controllers > Right click > Link an existing GPO > Deny LDAP Access > OK
CLIENT 2
- Access \\Client1\Share and copy images.zip & c2_script.ps1, after that we run c2_script.ps1.
powershell -ep bypass
.\c2_script.ps1
CLIENT1
- Finally, run c1_script.ps1, this will add user Adrian to Local RDP Group, enable RDP, and enable Administrator’s account.
powershell -ep bypass .\c2_script.ps1 - To assign user adrian SeImpersonatePrivilege
Go to:
"Windows Administrative Tools" > "Local Security Poliy" > "Local Policies" "USer Rights Assignment" > "Impersonate client after authentication" > add > Adrian
Attack Flow
-
Step 1: Initial Access Weak domain creds used to RDP to Client1
-
Step 2: Privilege Escalation Potato exploit (SeImpersonatePrivilege) used to get SYSTEM shell
-
Step 3: Credential Discovery Found cleartext creds in Administrator’s PowerShell history
-
Step 4: Lateral Movement Access SMB share on Client2 using creds
-
Step 5: Data Collection & Credential Cracking Download and crack ZIP file hash, extract usernames from images
-
Step 6: AS-REP Roasting Identify and crack ASREPRoastable user hash
-
Step 7: Kerberoasting Extract and crack SPN ticket hash
-
Step 8: Privilege Escalation via BloodHound Discover resetpassword chain and DCSync privileges
-
Step 9: Credential Dumping (DCSync) Dump NTDS hashes
-
Step 10: Persistence Forge Golden Ticket for persistence
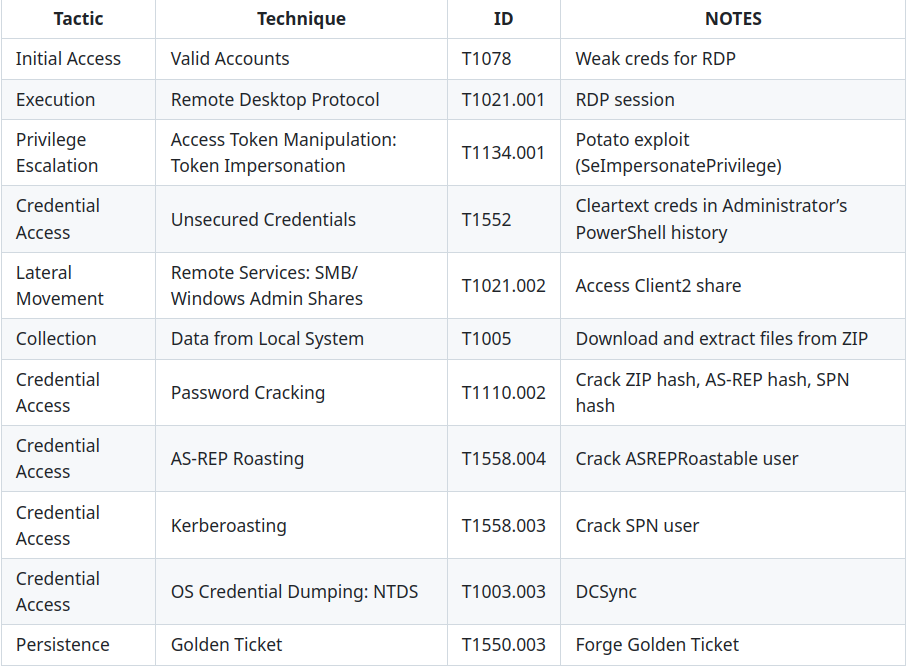
Mitre ATT&CK Coverage
License
This project is licensed under the MIT License - see the LICENSE file for details.